Learn how to update your BIOS to make your PC more stable. Also, find out if you need to do it at all, especially if everything is already working fine
BIOS is a set of firmware that is built into the motherboard and runs when the computer is turned on. It is responsible for making sure that the other components of the computer work together properly.
You can use a computer for years and not know that there are actually updates for some chip on the motherboard every few months. But in some cases, learning how to reinstall UEFI
will still be necessary. For example, if you need to upgrade a processor on an outdated motherboard or if your system is running with errors.
For the sake of this article I updated my computer's BIOS for the first time in my life. In the text I will tell you what the update will affect and who may need it, as well as help you solve problems that may arise after the update.
BIOS updates can cost you your motherboard
If you get the wrong firmware version or the lights go out during the update. Fortunately, motherboard and motherboard software manufacturers have perfected "foolproofing" - the BIOS simply won't recognize a firmware version that doesn't match it.
But the risk of being left with a broken motherboard due to a blackout is something that no manufacturer can prevent.
So do not update the BIOS if you have a low quality network in your apartment. Or buy an uninterruptible power supply to protect yourself during the procedure.
THEORY
Why update the BIOS
The short answer is that if everything is working fine and you're happy with everything, it's best not to touch the BIOS at all. Updating the basic I/O system
If components are not working properly, or if new components such as a processor or RAM are required, it's a good idea to update the basic I/O system.
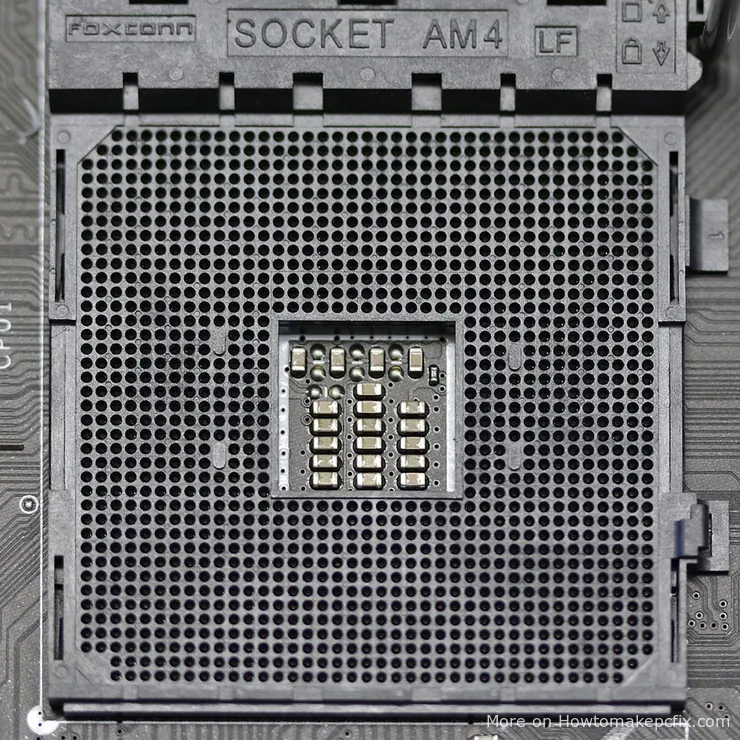
To improve motherboard compatibility with new processors. New processors come out every year or two, but the sockets on motherboards are updated every year or two.
on motherboards are updated two or three times less frequently. For example, if you bought a board with an AM4 socket for AMD processors in 2017, you could use it until about 2020. But in order to connect CPUs released after its release to it, you needed to re-flash it. The manufacturer simply couldn't provide in advance for compatibility with hardware that hasn't come out yet.
To avoid forcing people to buy a new motherboard every time a CPU is updated, manufacturers simply add support for fresh CPUs with firmware updates. Thanks to them, for example, a board with a B450 chipset and an AM4 socket bought in 2018 can be fitted with a Ryzen 7 5800X3D CPU released in 2022.
Intel's sockets change more frequently - once every year or two - so there's less need for upgrades. If you want to change the processor, you'll probably have to change the motherboard as well.
Physically, the socket does not change in any way - the new processor can be installed on any old motherboard with a suitable socket. However, it will not work without BIOS update.

One of the updates for my motherboard added support for 14th generation Intel CPUs
A UEFI update can help speed up RAM and make it more stable too. Depending on the manufacturer, get:
- Add support for new XMP profiles. These are special sets of settings that allow you to safely overclock the memory to the frequency stated in the specifications. Prior to enabling XMP, the memory is likely to run slower.
- Stabilize RAM performance. Immediately after the release of a new card on the market, it may have compatibility problems with some motherboards: they are made by several manufacturers at once and it is impossible to take into account all potential problems at once. But they are promptly fixed in updates.
- Improve PC responsiveness through better resource allocation and lower latency in data transfer.
-
- Increase system stability.** BIOS updates are the "hygienic minimum" when fixing complex PC malfunctions when it's not clear what specific component has a problem. To find out exactly what's wrong with your computer, you need to rule out outdated software and drivers. And UEFI is no exception.
Specifically, the update helps with "blue screens of death", computer slowdowns over time, and problems with faulty ports on the motherboard. Updates also affect Windows security - for example, closing vulnerabilities in the system that hackers can access.
Improve performance in games, by speeding up the processor's communication with the graphics card. Both AMD and NVIDIA. The former is called Smart Access Memory, or SAM, and the latter is called Resizable BAR, or ReBAR. In both cases, it allows the processor to access all video memory at once.
Without support for this technology, the two components communicate with chunks of information 256MB at a time. Whereas in the past there wasn't much memory in graphics cards and the bottleneck
was not felt, but with modern graphics cards in demanding titles the performance gain from using SAM and ReBAR
To enable the technology you need to update your video card driver and BIOS. After that a toggle switch will appear in the settings of the latter, after turning it on the graphics card will deliver more performance.
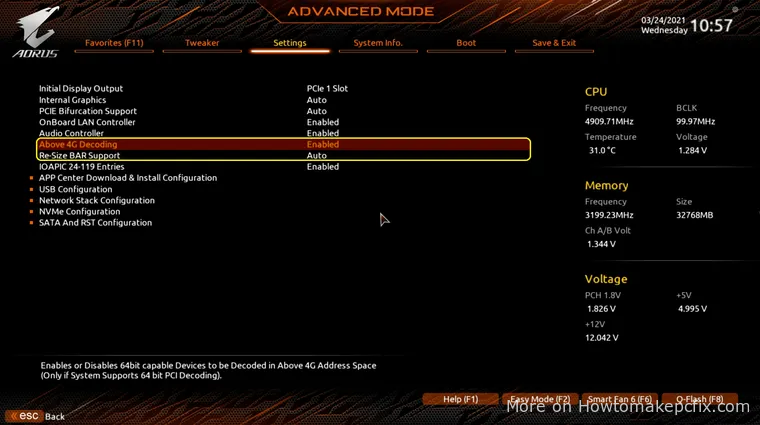
ReBAR or SAM must be enabled in UEFI before it can be used.
PRACTICE
How to update the BIOS
Caution. The UEFI is the main computing system in the entire computer. If your PC doesn't have a spare BIOS
and during the firmware reinstallation the computer shuts down - the lights go out in the house, a cat steps on the surge protector - the board will stop working.
It is impossible to fix it with your own hands: except solder out the chip responsible for UEFI from an identical board and solder it to your own.
In this case the other components will not be damaged - the processor, RAM and video card will be fine, and the LED lights on the fans will light up at startup. Except that there will be no picture on the monitor and the system will never start.
A blogger unplugged his computer during an update. The video cost him his motherboard
Another risk with UEFI upgrades is BitLocker encrypted
encrypted by BitLocker. After the update, the encryption will continue to work, but all keys will be reset because they were stored in BIOS memory.
You can only decrypt the drive with a special recovery key, if you have it somewhere in the cloud, on your phone, or on a piece of paper. You can't access your PC without it. To avoid headaches, disable BitLocker before upgrading your UEFI.
Gigabyte's advertisement of dual BIOS technology is shot in the style of "The Matrix" - the first BIOS is killed by improper reflashing, but it is promptly revived by the second one
If there's nothing wrong with the lights in the apartment or you have an uninterruptible power supply and no BitLocker, you can move on to installation. Fortunately, manufacturers of modern motherboards have perfected BIOS reflashing. In most cases, the system does not see the update file if it is intended for another board. That's why you can't kill it with an incorrect file: it just won't appear in the menu. Although budget models from little-known manufacturers may not have such "foolproof" protection.
Besides, manufacturers regularly simplify the installation process. For example, on ASUS boards on the back panel there is a separate USB-port for BIOS flash drive - only a power supply is needed to update the firmware.
Preparation. You will need:
- A flash drive or hard disk with FAT32 file system - otherwise UEFI will not see the files on it.
- A file with the update.
Look for a flash drive at home or borrow one from someone you know. Any flash drive will do, but preferably a cleanly formatted one. The update weighs about 9 MB. Click "Properties" and find out what file system the drive is formatted in. If it's not FAT32, format it again.
Look for the update file on the motherboard manufacturer's website. You can find out its exact model on the box or in the computer's specifications. Here's where to look for data on Windows-based systems:
- Press Win + R, type msinfo32, and press Enter. In the window that opens, look for the "Mainboard Model" line.
- Use any of the third-party free programs: Speccy, AIDA64 or CPU-Z.
Important: the files should be searched for the exact same motherboard model. It took me a long time to figure out why the system couldn't see my files. It turned out that I downloaded them for a motherboard version without wifi support. My motherboard does support it, and the file is different

There is no need to download a separate software to find out the motherboard model: it will give the same information as Windows System Information
Update. Extract the firmware file from the archive - most likely it will have the extension .1g0 or .ag0 - copy it to any place on the flash drive. It's better to copy it directly to the root so that you don't have to search for it later in the prehistoric UEFI-interface.
Enter BIOS. To do this, restart the computer and during the reboot constantly press the Del or F2 keys - depending on your motherboard. If you have previously enabled quick startup in the system
If you have previously enabled Quick Start in your system, you will not be able to enter UEFI when rebooting, there will be no time to press the right key.
In this case, type the phrase "BIOS" in Windows search and go to the menu "Change Advanced Startup Settings" → "Restart Now". The computer will restart and a menu with a blue background will appear. In it, choose "Troubleshooting" → "Advanced Options" → UEFI Firmware Options". The computer will reboot into BIOS.
The item is also available from the system settings
The main thing is not to return the PC to its original state
UEFI on different motherboards looks different on different motherboards, so if your buttons will be different from mine, check the installation instructions on the manufacturer's website.
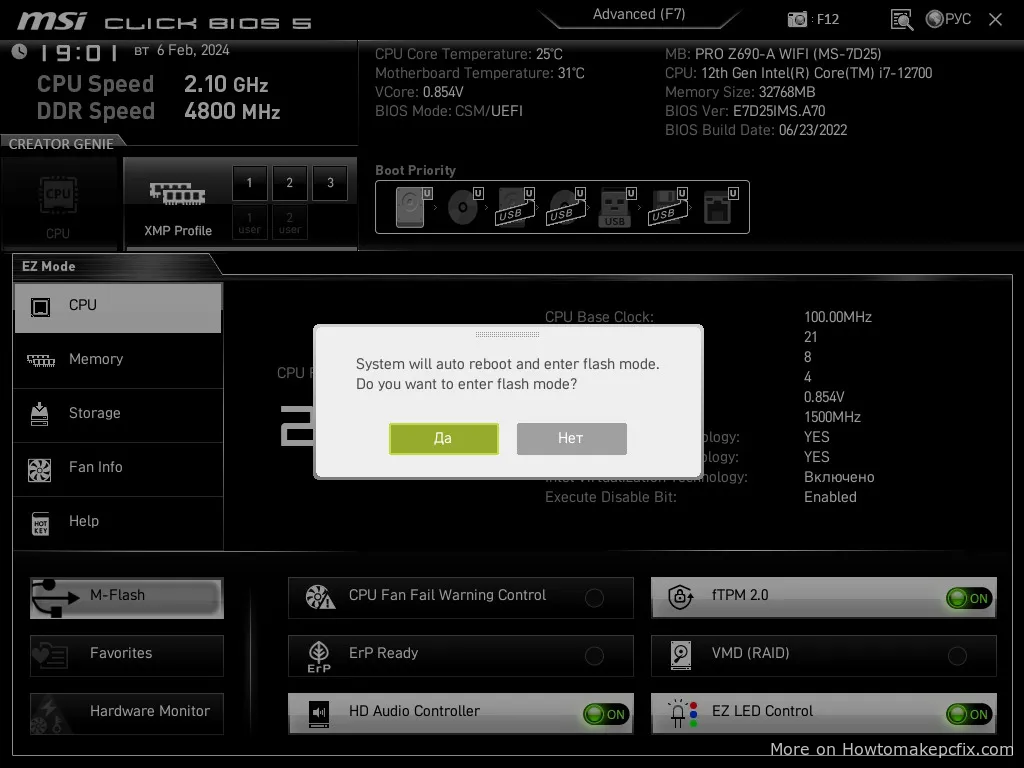
In the main BIOS window, select M-Flash or similar. The system will reboot and you will be taken to the reflash window. In it you need to select the disk where the new software file is stored and double-click on it.
The flashing process will take a couple of minutes, after which the PC will reboot several times and finally turn on. If you had a pin code for the system, you will have to change it. Keep in mind, this requires access to the e-mail address you specified when registering with Microsoft.
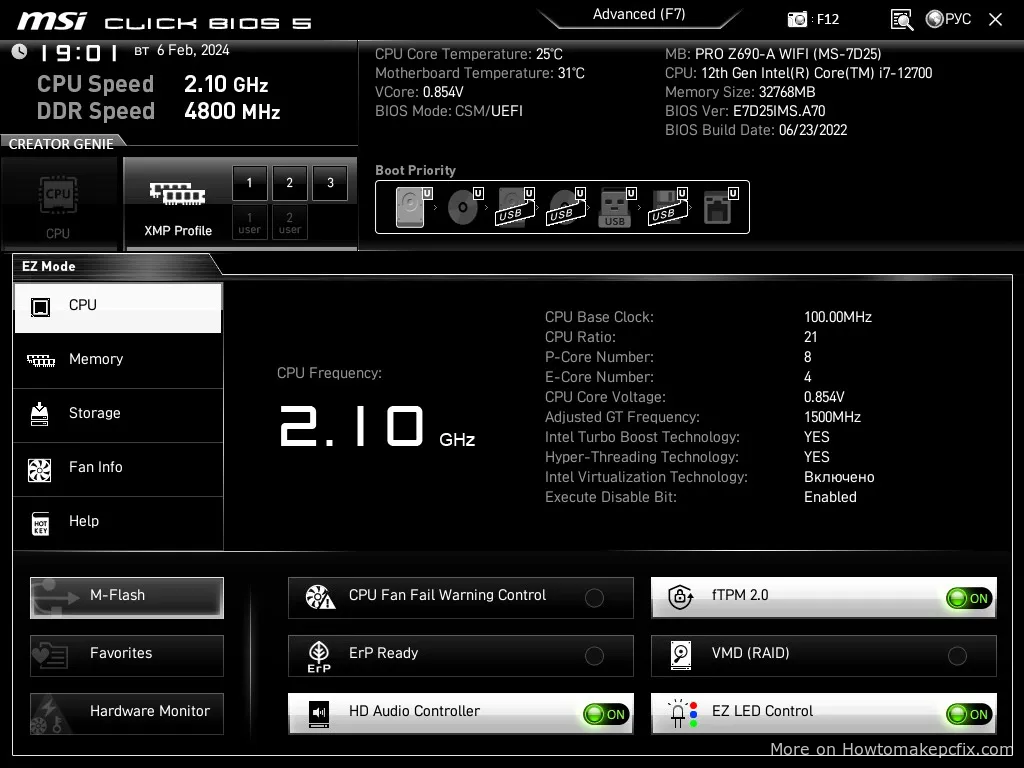
UEFI main screen. Come back here after reflashing to customize CPU and RAM overclocking, you will find a lot of interesting things to do
Reboot into firmware mode
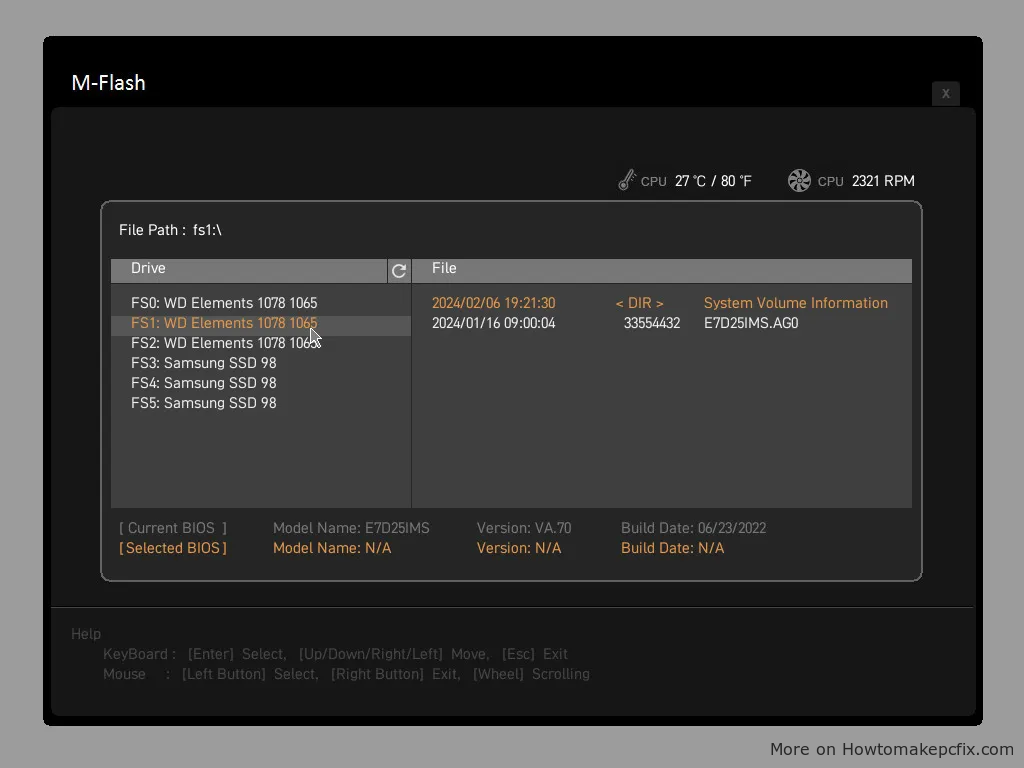
My external hard drive has three virtual volumes, which is why it shows up as three different drives
Confirming the upgrade
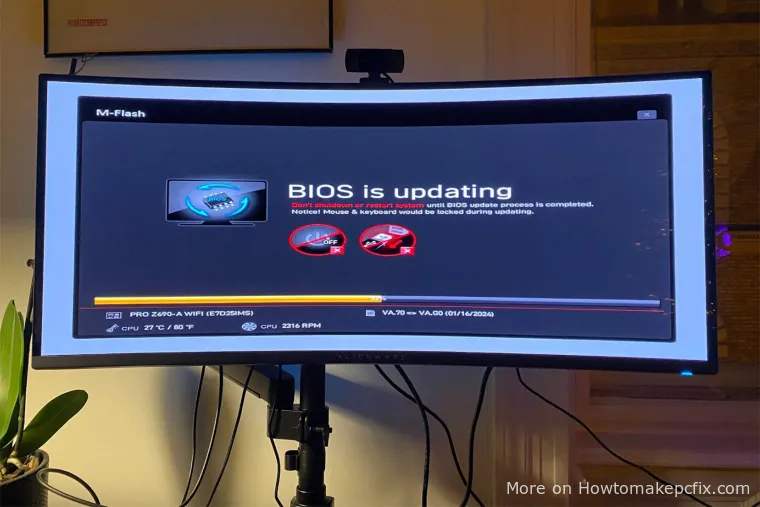
The most troubling part
How to solve common upgrade problems
It's good if you closed this article when you reached the end of the previous paragraph. But if you still had to look at this section, it means that something went wrong. Here are the main errors and ways to solve them.
System does not see the firmware file. Three possible causes:
- The flash drive is formatted to a file system other than FAT32. Format it again and try again.
- There are invalid characters like Cyrillic letters or ANSI characters in the name of the flash drive or the folder where the firmware file is located. Rename the drive in Properties and put the file in the root of the flash drive, i.e. without additional folders.
- The firmware file does not match your motherboard. Double-check the name again and remember that almost every board has three to five variations. You can download them all at once so that you don't have to split-test and reboot your computer several times. You will only be able to flash the right one anyway.
The computer has gone into an endless reboot. The matter is in a broken firmware file - perhaps it was not downloaded from the site or was damaged during copying.
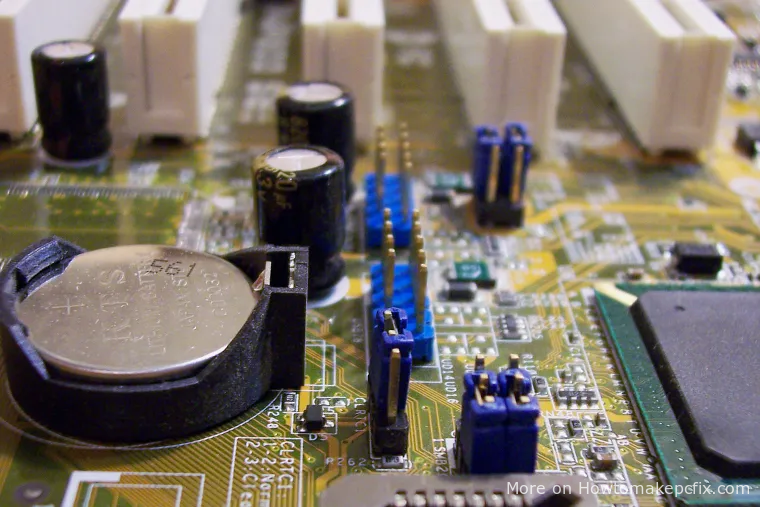
Try resetting the BIOS by removing, waiting a couple minutes, and putting back in the flat battery on the motherboard case. This will reset the UEFI.
If you don't see the battery, then it's somewhere under the heatsinks screwed to the surface of the board. Before unscrewing anything, look for information on forums or social media threads. Instead of removing the battery, it may be enough to close two special contacts somewhere at the bottom of the board with a screwdriver.
The upgrade failed and now the computer won't turn on. Bad news: you need to fix the motherboard. Some service centers have special programmers or people who can safely resolder the entire chip. But the parts you need are much rarer than you'd like - especially in small towns.
The computer started to slow down after the update. The matter is in the drivers, which can be reset when updating BIOS. I had a problem with my video card driver and it was resolved after an update in Nvidia GeForce Experience. If the drivers are updated and the problem persists, install an earlier version of the UEFI firmware - you can find it on the manufacturer's website.
Short: how to update BIOS
- Understand why you need to upgrade. If your computer is working fine, it's better not to touch it.
- Prepare carefully: the update can kill the motherboard if the computer is turned off during the update. If you have network problems, get a UPS.
- Format the flash drive to FAT32 and copy the firmware file to the root. You can get it from the motherboard manufacturer's website.
- Go to the BIOS and select the firmware file in Flash mode.
- If you have problems, try a different flash drive, firmware or driver update.
- If the computer does not turn on after the update, look for a service center or buy a new board.